
Showing posts with label Side Dish Recipes. Show all posts
Showing posts with label Side Dish Recipes. Show all posts
Thursday, December 15, 2011
Rice Salad with Apples
Working fruit and vegetables into every meal has been a challenge of mine that I totally killed this week! Instead of your same old buttered rice, a few extra ingredients and I had a great, fresh side. I tweaked a recipe I found on familyfun.com, but basically all you have to do is peel, slice, and chop up an apple, grab some raisins, some fresh chopped almonds and mix. The recipe that inspired me was suggested to be served cold with a little honey, olive oil mixture, but I just added a little squeeze of honey. It was nice to switch it up a little as rice is cheap but can get boring after awhile.
 I also managed to sneak in some veggies into my dessert. Just wait for that post. :-)

Monday, December 12, 2011
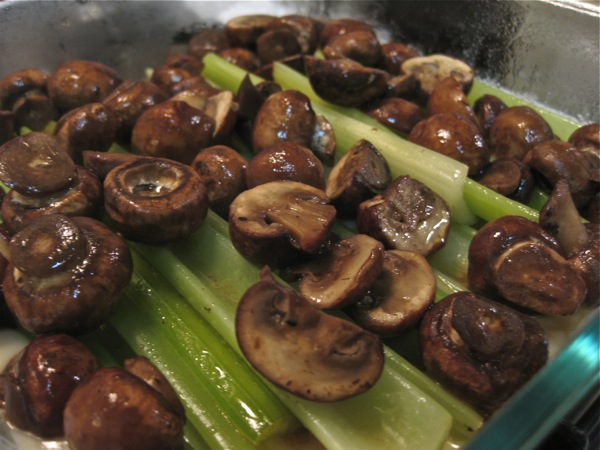
Cream of Celery Casserole
I had extra celery left over in the vegetable drawer and creme of celery soup in the cupboard so I decided to get a little experimental and make creamy celery casserole. Now let me prefix this with the following statement: I don't care for celery. I only ever buy it to put it in soup or in this case, add flavor to the turkey, and thus I ended up with extra. I did not want to see it go to waste, so I decided to run with the idea of a celery casserole I found somewhere on the web.
 I sauteed the celery in butter for about 5 minutes until I could put my fork through it, and then I transferred it to my pyrex pan, added sauteed mushrooms, cream of celery soup, some bread crumbs and a little vegan cheese.
 I baked it for about 30 minutes and transferred it to my plate. It made a nice presentation, but I did not care for it. Celery and I just do not see eye to eye. I did however eat all my mushrooms and cheese- those I definitely could not let go to waste.

Thursday, November 17, 2011
Against the Grain Stuffing
I made my first batch of stuffing a couple of weeks ago and used a great recipe from Against the Grain Gourmet. I'm not really a huge fan of stuffing, but since I've been giving everything else like soup a try, why not stuffing? And I got rave reviews!


Monday, November 29, 2010
Garlic Mashed Potatoes
When I was growing up, every thanksgiving there were both mashed potatoes and sweet potato casserole on the table. I love sweet potato casserole, and have mastered my mother's version. As for the mashed potatoes, well I think I've stumbled upon my own, awesome version. Whether you like them smooth or chunky, or somewhere in between this recipe is always tasty.
Ingredients
3 lbs. unpeeled red potatoes, quartered *this will make 4 servings
4-6 Tbsp butter
3 ounces Romano cheese, grated- *any hard cheese will do
2 1/2 tablespoons raw chopped garlic
1 1/4 teaspoons salt
1 1/4 teaspoons dried oregano
1 teaspoon dried parsley

Directions
1. Bring a large pot of salted water to a boil. Add potatoes and cook until tender but still firm, about 25 minutes, but it depends on how small the pieces are.
2. Drain potatoes.
3. Stir in butter, cheese, garlic, salt and oregano. The more you stir the smoother they'll get.
4. Do a taste test, but otherwise you'll be good to go. Just Serve & Enjoy!
Ingredients
3 lbs. unpeeled red potatoes, quartered *this will make 4 servings
4-6 Tbsp butter
3 ounces Romano cheese, grated- *any hard cheese will do
2 1/2 tablespoons raw chopped garlic
1 1/4 teaspoons salt
1 1/4 teaspoons dried oregano
1 teaspoon dried parsley

Directions
1. Bring a large pot of salted water to a boil. Add potatoes and cook until tender but still firm, about 25 minutes, but it depends on how small the pieces are.
2. Drain potatoes.
3. Stir in butter, cheese, garlic, salt and oregano. The more you stir the smoother they'll get.
4. Do a taste test, but otherwise you'll be good to go. Just Serve & Enjoy!
Wednesday, November 3, 2010
Seasoning Packets
I have come to accept that not everyone is as creative or exploratory as I am in the kitchen, so I would like to open everyone's eyes to the versatility of seasoning packets. I know there are other gluten free brands out there, but two I've been using lately are Cali Fine Foods and Mayacamas.
 Cali Fine Foods packets are produced in a dedicated gluten free facility, and come in 5 flavors. The Garlic Gusto makes a fabulous dip, and the herb medley is nice blended with olive oil and used as a light pizza sauce. They also have a sweet 'n spicy bbq mix that is a great taco seasoning substitute, but I was feeling lazy one night ans used it a seasoning for a pot of chili.

Mayacamas is not a dedicated gluten free company, but they do test their gluten free products. offers both what they call skillet toss mixes, and pasta sauce mixes. I find the skillet tosses to be a little bit more versatile, and love the green olive pesto as a pesto sauce for a veggie pizza. The dried tomato is great mixed with cream cheese and put on a bagel, and the spicy one is awesome mixed in as a marinade with ketchup or bbq sauce. At less than $2 a packet, any of either brand really are a great addition to have on hand in the kitchen cupboard.
 Cali Fine Foods packets are produced in a dedicated gluten free facility, and come in 5 flavors. The Garlic Gusto makes a fabulous dip, and the herb medley is nice blended with olive oil and used as a light pizza sauce. They also have a sweet 'n spicy bbq mix that is a great taco seasoning substitute, but I was feeling lazy one night ans used it a seasoning for a pot of chili.
Mayacamas is not a dedicated gluten free company, but they do test their gluten free products. offers both what they call skillet toss mixes, and pasta sauce mixes. I find the skillet tosses to be a little bit more versatile, and love the green olive pesto as a pesto sauce for a veggie pizza. The dried tomato is great mixed with cream cheese and put on a bagel, and the spicy one is awesome mixed in as a marinade with ketchup or bbq sauce. At less than $2 a packet, any of either brand really are a great addition to have on hand in the kitchen cupboard.
Wednesday, August 25, 2010
A flop
 I loved the concept- healthy french fries, but this company just did not get it right. Apple, broccoli, cauliflower, and carrot fries- gluten free, but not made in a clean facility, targeting the busy mom who wants their kids to eat their veggies without a fight. This is one of those cases where there just isn't a short cut.
Tuesday, June 1, 2010
Namaste Foods
 This past weekend I was asked to demo Namaste Food mixes and I decided to make their vanilla cake and pasta salad using their pasta pisaveria mixes. I had only ever used their frosting mix, so this was a new one for me, and I was happy with the overall results.
The cake mix makes a 9 x 13, or 2 9" rounds. It was super easy to make, and had a nice flavor. It did seem a little dark in color to me, more golden brown, than the white/yellow color we're used to from a vanilla cake mix. The cake was very moist from the added water, but I'm sure you could use an alternative milk instead of water to get an even more moist and soft cake.
The pasta mix really impressed me. Just the pasta and the seasoning packet come in the pasta pisaveria mix, but add in some vegetables, a little apple cider vinegar, and some olive oil, and you have yourself a delicious pasta salad. I normally like a slightly heavier dressing on my pasta salad, but this was really tasty, and quick and easy to make.
Overall everyone enjoyed my tasty treats, and almost everyone could, because the mixes were gluten/wheat, dairy, caisen, corn, soy, potato and nut tree.
Friday, February 19, 2010
Quinoa: Gourmet Style
 I decided to get a little fancy and jazz up our basic side dish of quinoa with butter and make into a beautiful cake, which made me think of making crab cakes, but that's for another day.
Ingredients
1/2 cup quinoa cooked
1 clove garlic, minced
1/2 carrot, shredded
1/4 cup green onions, chopped
1/4 cup diced cheese, optional
salt, pepper, & basil to taste
4 Tbsp breadcrumbs
2 eggs
Olive oil
Directions
1. Cook quinoa according to package instructions.
2. In large bowl mix cooked quinoa, vegetables, spices, breadcrumbs, and cheese into bowl.
3. Add the eggs and mix gently.
4. Use a 1/2 measuring cup as a mold, and form patties with the mixtures.
5. Heat oil in pan, and over medium heat brown patties on each side, taking about 5 minutes per side.
These were yummy, and made a great presentation. They would be even better with a light sauce drizzled over the top; perhaps a lemon butter sauce. I'll have to do that next time.
*Recipe Tweaked from Delight Magazine
Tuesday, February 2, 2010
Quinoa Salad
I like to make sure we have some healthy lunch time options in the house, but green salads can get boring after awhile. Unlike my husband's habit to play wii everyday, I know he likes it when I switch it up for his lunch. Yes the word salad is still involved, but this is a tasty, vegetarian option: Quinoa Salad.
Ingredients
1 cup quinoa (white or red)
1/2 cup water
1 teaspoon olive oil
1/2 cup mushrooms, quartered
1/4 cup chopped bell pepper.
1/4 cup chopped onion
handful of chopped green onions
1/4 cup kidney beans
1/4 cup pinto beans
1/8 teaspoon salt, or to taste
1/8 teaspoon ground black pepper
1/8 tsp garlic
2 tablespoons olive oil
1 tablespoon lemon juice
Directions
1. Place the quinoa and water in a medium sauce pot. Bring to boil, turn to low, cover, and let sit for 15 minutes.
2. In a saucepan heat olive oil and saute mushrooms, green onions, and onion.
3. Combine quinoa and sauteed vegetables in a bowl.
4. Add in beans, and seasonings.
5. Combine lemon juice and olive oil. Pour over top. Mix well.
6. Store in fridge until ready to serve.
You could easily add in feta cheese, hard boiled eggs, green beans, or anything else you want. I pretty much just used what I had in the house. The husband told me it was satisfying, so I'm glad he liked it.

Ingredients
1 cup quinoa (white or red)
1/2 cup water
1 teaspoon olive oil
1/2 cup mushrooms, quartered
1/4 cup chopped bell pepper.
1/4 cup chopped onion
handful of chopped green onions
1/4 cup kidney beans
1/4 cup pinto beans
1/8 teaspoon salt, or to taste
1/8 teaspoon ground black pepper
1/8 tsp garlic
2 tablespoons olive oil
1 tablespoon lemon juice
Directions
1. Place the quinoa and water in a medium sauce pot. Bring to boil, turn to low, cover, and let sit for 15 minutes.
2. In a saucepan heat olive oil and saute mushrooms, green onions, and onion.
3. Combine quinoa and sauteed vegetables in a bowl.
4. Add in beans, and seasonings.
5. Combine lemon juice and olive oil. Pour over top. Mix well.
6. Store in fridge until ready to serve.
You could easily add in feta cheese, hard boiled eggs, green beans, or anything else you want. I pretty much just used what I had in the house. The husband told me it was satisfying, so I'm glad he liked it.
Wednesday, December 30, 2009
Shrimp & Fries, Gourmet Style
For larger families I imagine this would get pricey, but for Christmas dinner in our house we have seafood. This year it was jumbo prawns. Years ago my husband made me these shrimp for an anniversary dinner and now they are part of our regular recipe collection. Simple and easy these shrimp are gourmet if cooked correctly. Shrimp can quickly go from cooked to overcooked, so make sure you watch them carefully.
Lemon Pepper Grilled Shrimp
Ingredients
1 lb jumbo shrimp
1/2 cup olive oil
1/2 cup lemon juice
2 Tbsp ground pepper
butter for melting/dipping
Directions
1. Combine olive oil, lemon juice, and pepper in a bowl.
2. Peel & De-vein shrimp.
3. Marinade in oil mixture for 15 minutes. (Marinading seafood for longer is not necessarily better, especially shrimp).
4. Heat grill.
5. Remove shrimp from marinade and place on skewers.
6. Grill or broil for 3 minute (can depend on size, but absolutely no more than 5 minutes).
7. Melt butter and use as a dip for cooked shrimp.
 And as a side, I decided to try something new. The smaller you cut these homemade sweet potato fries, the more crispy and like a regular fry they will be. They were a little on the spicy side, so depending on how you like things, you might want to decrease the cayenne to 1/8 or just leave it out. For my husband however, they were perfect and he ate up an extras.
Sweet Potato Fries
Ingredients
1-2 large sweet potatoes (A 3 lb sweet potato make enough fries for 3-4 people)
2 Tbsp vegetable oil
4 Tbsp taco seasoning mix
1/4 Tsp cayenne pepper
Directions
1. Preheat the oven to 425 degrees.
2. In a plastic bag, combine sweet potatoes, oil, taco seasoning, and cayenne pepper.
3. Close and shake the bag until the fries are evenly coated.
4. Spread fries out in a single layer on a large baking sheet.
5. Bake for 30 minutes, turn the fries over using a spatula, and cook for another 30 minutes, or until they are all crispy on the outside and tender inside.
Lemon Pepper Grilled Shrimp
Ingredients
1 lb jumbo shrimp
1/2 cup olive oil
1/2 cup lemon juice
2 Tbsp ground pepper
butter for melting/dipping
Directions
1. Combine olive oil, lemon juice, and pepper in a bowl.
2. Peel & De-vein shrimp.
3. Marinade in oil mixture for 15 minutes. (Marinading seafood for longer is not necessarily better, especially shrimp).
4. Heat grill.
5. Remove shrimp from marinade and place on skewers.
6. Grill or broil for 3 minute (can depend on size, but absolutely no more than 5 minutes).
7. Melt butter and use as a dip for cooked shrimp.
 And as a side, I decided to try something new. The smaller you cut these homemade sweet potato fries, the more crispy and like a regular fry they will be. They were a little on the spicy side, so depending on how you like things, you might want to decrease the cayenne to 1/8 or just leave it out. For my husband however, they were perfect and he ate up an extras.
Sweet Potato Fries
Ingredients
1-2 large sweet potatoes (A 3 lb sweet potato make enough fries for 3-4 people)
2 Tbsp vegetable oil
4 Tbsp taco seasoning mix
1/4 Tsp cayenne pepper
Directions
1. Preheat the oven to 425 degrees.
2. In a plastic bag, combine sweet potatoes, oil, taco seasoning, and cayenne pepper.
3. Close and shake the bag until the fries are evenly coated.
4. Spread fries out in a single layer on a large baking sheet.
5. Bake for 30 minutes, turn the fries over using a spatula, and cook for another 30 minutes, or until they are all crispy on the outside and tender inside.
Friday, December 4, 2009
Fabulous Pesto Recipe
There are tons of different ways to make pesto, but here is a gluten free, nut free version from 2 of my favorite cookbook authors. It's a great one for when broccoli is in season. Sometimes I end up adding in extra olive oil and a little cooked spinach, but the basic recipe is as follows:

Ingredients:
4 cups broccoli
1 clove garlic
1/2 cup cilantro
1/4 cup basil
1/4 cup Parmesan cheese
1/4 cup olive oil
1/4 cup chicken stock
1/4 tsp salt
Directions:
1 Steam Broccoli until tender.
2. Using a food processor combine all ingredients until it reached your desired smoothness.
3. Toss with hot pasta or store in air tight container for up to 48 hours.
From The Best Gluten Free Family Cookbook by Donna Washburn & Heather Butt

Ingredients:
4 cups broccoli
1 clove garlic
1/2 cup cilantro
1/4 cup basil
1/4 cup Parmesan cheese
1/4 cup olive oil
1/4 cup chicken stock
1/4 tsp salt
Directions:
1 Steam Broccoli until tender.
2. Using a food processor combine all ingredients until it reached your desired smoothness.
3. Toss with hot pasta or store in air tight container for up to 48 hours.
From The Best Gluten Free Family Cookbook by Donna Washburn & Heather Butt
Wednesday, December 2, 2009
Simple Mushroom & Rice Stuffing
 I've never been one for a traditional Thanksgiving, normally we have seafood, but for some reason this year I went the traditional route. However, what do you if you're gluten free, and don't want to spend the money on gluten free bread to make your own stuffing...use rice. This is close to a regular side dish I might make with chicken or pork, and was absolutely delicious. The plus side- it's easy to make, and relatively cheap to serve to a large group. Of course you could spruce this up a little with some pine nuts, or pecans, and dried cranberries, but I was trying to keep the costs down by using what was mainly already in the house.
Ingredients:
1 cup brown rice, cooked
2 lbs mushrooms, diced
1/2 yellow onion, diced
butter
salt
pepper
parsley
Directions:
1. Cook rice per directions on the package.
2. Saute onion and mushrooms in butter until soft and golden.
3. Combine rice and vegetables.
4. Season to taste with salt, pepper, onion powder, garlic powder, parsley.
5. Bake in the oven uncovered at 375 degrees for 30 minutes or until golden brown.
Wednesday, November 4, 2009
Fun Potato Recipes
 I love anything that involves cheese and sour cream, and my husband knows that. Years ago I had bought this cute, cheap cookbook that was full of recipes for couples, and he made me several great meals from it. One of the side dishes were these twice baked potatoes. They're slightly better for you than a microwaved baked potato (check out the glycemic index), but do involve a few extra steps. So if you're looking to impress any guests or your family this coming holiday season, you can try out these twice baked potatoes, or if you're looking for more of an appetizer/finger food try making some potato skins.
For Twice Baked Potatoes you'll need:
2 potatoes
1/2 cup sour cream
1 egg
2 Tbsp butter
handful of chives
handful of bacon bits
Directions
1 Preheat oven to 450 degrees.
2 Bake potato for 1 hour. Remove from oven, slice in half lengthwise, and allow to cool for 10 minutes.
3 Remove the insides and put them in a mixing bowl, trying to keep the skin intact.
4 Mix the potato to smooth and all all other ingredients, saving the potato toppers for last.
5 Add toppers and stir once or twice-enough to spread throughout the mixture without grinding them in.
6 Spoon the mixture back into the potato skins.
7 Reduce oven temperature to 350 degrees and bake for 15 minutes, or until tops are lightly browned.
8 Serve & Enjoy!
For Potato Skins you will need:
4 large baking potatoes
3 Tbsp olive oil
1 Tbsp grated Parmesan cheese
1/2 tsp salt
1/4 tsp garlic powder
1/4 tsp paprika
1/8 tsp pepper
Potato Toppers: bacon bits, shredded Cheddar cheese, sour cream, green onions, and anything else you want
Directions:
1 Scrub potatoes and poke small holes into them.
2 Place in greased pan.
3 Bake in 400 degree oven for approximately one hour (until you can push the fork into the potato, but potato is still really firm).
4 Let potatoes cool for a few minutes.
5 Cut potatoes in half lengthwise and carefully scoop out pulp. Leave just enough to keep skin sturdy.
6 Put skins bake onto baking tray, skin side up, and brush skin with oil.
7 Bake in 400 degree oven for 10-15 minutes, until skins seem to be crispy.
8 Flip skins over and brush insides with oil.
9 Bake at 400 degrees for another 5 minutes.
10 Sprinkle with cheese and leave in oven until cheese is melted.
11 Add all the fun potato skin toppings and enjoy!
Wednesday, October 21, 2009
Acorn Squash
 So while at Dave's Pumpkin Patch this past weekend I decided I wanted to bake some squash. I had never had acorn squash, and I was told it was similar to butternut squash, which my husband likes, so I got a couple of each kind and then later figured out what to do with them. It was really difficult to cut this sucker in half, but eventually I I got it split. I scooped out the center seeds, and followed this fairly easy recipe for a great side dish.
Ingredients:
1 medium size acorn squash
salt and pepper to taste
1/4 cup butter
1 cup nuts
1/2 cup brown sugar
1 Tsp cinnamon
1/8 Tsp nutmeg
3 Tbsp orange juice
Directions:
1. Preheat oven to 350 degrees.
2. Cut squash in half and scrap out seeds.
3. Set squash halves, cut side up, on baking sheet.
4. Sprinkle with salt and pepper.
5. Cover with foil.
6. Bake 25 minutes.
7. Combine butter, nuts, brown sugar, cinnamon and nutmeg and orange juice.
8. Remove foil and fill centers with stuffing.
9. Bake another 15 to 20 minutes, uncovered.
The stuffing stays a liquid/soup, but if you use a spoon and scoop it out, dipping the piece into the center liquid, it is absolute delicious. Very sweet and savory. You could very easily buy some small baby acorn squash, chop off the top, scoop out the center, and do individual servings for everyone for an awesome preservation.
Recipe from 1,000 GF Recipes by Carol Fenster
Monday, October 12, 2009
Gluten Free Grains
 Some people feel lost and confused about which grains to eat when they switch to a gluten free diet, but there are a lot of grains that are safe to eat. In fact, if it weren't for being on a gluten free diet, I'm not sure if I would eat some of the great products I do. Quinoa, Teff, and Millet are a few grains that are gluten free, that only now do I enjoy eating.
We used to eat a lot of baked potatoes in the house, but I switched us to rice because potatoes are rather high in carbohydrates and can be high on the glycemic index. However, rice can get boring, and when most gluten free foods are made with rice flour, I don't really want to have rice for dinner, so I've introduced quinoa into the mix. My hus
 band says it reminds him of couscous, (which I've never had, and never will since it's not gluten free). He was so excited when he first tasted it, and said we should stop eating rice and only eat quinoa from now on. Then he semi-retraced his statement and asked how expensive it was, to which I replied slightly more or slightly less depending on the type of rice. Just like rice you can boil it in water, broth, or a stock, and this time around I used vegetable broth, which made it so I did not need to use any butter or salt. Light and fluffy in taste, quinoa is a great addition to any household, gluten free or not.
Tuesday, August 11, 2009
Favorite Foods Aren't Just a Memory
 Back in the days when I could out to a restaurant, without a care in the world, the one thing I could never get enough of were the cheese rolls at Red Lobster. Well, a recipe came across my lap a few months ago and I have been dying to try it. Today was the lucky day. It seems that as each person tried it they made their own alterations to the recipe, however nevertheless I must give thanks to Joan, a local Sacramento CSA member, and then there are the two gluten free forum members, Fiddle-Faddle and Robyn Ryberg; Wherever you are- Thank you.
I tweaked the recipe a little to suit my needs, and these are a very close mimic of the seafood chains' cheese rolls! Here's what I did:
Ingredients:
1/3 cup melted butter
3/4 cup original almond breeze: any milk will do.
1 Tbsp sugar
1 Tbsp baking powder
1/4 tsp baking soda
1/2 tsp salt
3/4 cup cornstarch
1 1/2 cups Tom Sawyer GF Flour Blend (this has xanthan gum in it. If you use a different blend you will want to add in about 1 tsp xanthan gum).
3/4 cup shredded cheddar cheese
Directions
1. Blend all ingredients together in the order listed.
2. Drop golfball-size blobs onto a greased baking sheet. (You'll get about 24 small biscuits, or 8-10 large biscuits).
3. Bake at 375 degrees for 12-15 minutes.
4. Place on cooling rack.
5. If to be consumed immediately, melt some extra butter and shake in some salt, garlic powder, and some parsley, and brush on with a pastry brush. Otherwise once cooled storage in a Ziploc. When ready to serve heat biscuits up and brush with melted butter mixture.
Monday, May 18, 2009
Gluten Free Picnic Tips
The summer sizzle is approaching which means picnics and barbecues, and social gathering involving food can be nerve racking for those of us on a gluten free diet. I know I tend to travel with food in my purse, and eating beforehand just makes the actual event sad and lonely. There are individual packets of gluten free soy sauce and gluten free salad dressing available now which does make things slightly easier, but eating only green salad and fruit isn't exactly completely satisfying. I suggest arriving to any gatherings early and offer to help with the food preparation if possible. If you're comfortable enough with the event organizer ask if they could set aside the main protein and bring your own rub with you. In addition, it's been habit for those of us who are gluten free to always bring one dish with us to share, but if others aren't gluten free the question is what to make without spending too much money. My suggestion is pasta salad.
 Dressing:
1/2 cup mayonnaise
1/2 Tbsp red wine vinegar
3 Tbsp Oli's Sweet 'n Spicy Sauce (you could attempt to substitute this ingredient with some sugar and hot sauce)
1/4 tsp ground black pepper
1 tsp garlic powder
1/2 tsp onion powder
1/2 tsp dried basil
1/2 tsp dried parsley
1 tsp salt
Salad:
2 cups gluten free pasta (I suggest using the brand bionaturae)
1/2 cup chopped tomatoes
1/4 cup chopped red onion
1/2 cup cucumber, chopped
1/2 cup chopped bell pepper, any color
1/4 cup bacon bits, optional
4 oz cubed cheese, optional
1. Cook pasta according to package directions.
2. Rinse in cold water, and drain.
3. In a large mixing bowl, whisk together dressing ingredients until well blended.
4. Add cooked pasta and vegetables; fold gently until mixed.
5. Chill several hours and stir gently before serving.
 Dressing:
1/2 cup mayonnaise
1/2 Tbsp red wine vinegar
3 Tbsp Oli's Sweet 'n Spicy Sauce (you could attempt to substitute this ingredient with some sugar and hot sauce)
1/4 tsp ground black pepper
1 tsp garlic powder
1/2 tsp onion powder
1/2 tsp dried basil
1/2 tsp dried parsley
1 tsp salt
Salad:
2 cups gluten free pasta (I suggest using the brand bionaturae)
1/2 cup chopped tomatoes
1/4 cup chopped red onion
1/2 cup cucumber, chopped
1/2 cup chopped bell pepper, any color
1/4 cup bacon bits, optional
4 oz cubed cheese, optional
1. Cook pasta according to package directions.
2. Rinse in cold water, and drain.
3. In a large mixing bowl, whisk together dressing ingredients until well blended.
4. Add cooked pasta and vegetables; fold gently until mixed.
5. Chill several hours and stir gently before serving.
Subscribe to:
Posts (Atom)